Printer Tutorial
3 posts • Page 1 of 1
Printer Tutorial
![]() by Benjii » Mon Sep 17, 2012 9:17 am
by Benjii » Mon Sep 17, 2012 9:17 am
This is for AlgodooInfinty who asked me for a tutorial, so... here it is!!
If you're new to algodoo the making a 2d printer can sound very complicated, particularly if you have no knowledge of scripting, but really it's pretty simple.
All of these steps should be completed with the simulation paused.
Step 1
Firstly, make a biggish box and add some quite small wheels, then set their motors to around 60 rpm. You may want to adjust the speed later on depending on how fast your printer can produce letters/numbers.
Step 2
Next you'll need to make the mechanism. I'm going to use the mechanism i used in my Printer V2. Okay, you'll need a long thin box in a vertical position. Now create a wide thin box (horizontal) and using the rotate tool tilt itto around
-15˚, Now align them with the 2 diagonal boxes overlapping at each end but on opposite sides (a little difficult to explain, you're best looking at the scene (link at the bottom)). Next you need to add an axle to where the 3 boxes overlap, now move this assembly over to your box on wheels and align it in the centre. Now make some axles in the middle of the angled boxes. Next, highlight the whole thing and go to Collision layers> No self collision - on, and add a spring to the bottom of the top diagonal bow on your linkage assembly, change its torque to around 500Nm and damping to 1. Finally add a tracer to the end of the bottom diagonal box that is about the width of the box itself.
Step 3
Now's the tedious part, clone your linkage assembly over somewhere out of the way (it'll make your life a whole lot easier if you do!). Then, make a clone of your clone and shrink the vertical box, move the bottom diagonal one and replace the lost axle. Keep progressively doing this until you have 5 with the smallest just under half of the size on the biggest. It's important to remember that you're only shrinking the vertical box, the rest stays the same. When you're done, leave the smallest one's collision layer at A but, as you move to the next one switch it's collision layer to B, and the next one's is C and so on. Keep doing this until all on your linkages are a different collision layer. Now you need to align them on top of each other like shown in the scene (can't explain how to do it but put them all on top of each other with the top angled box of all in the same place).
Step 4
Now the printer is pretty much ready you need to make the drum mount. First to stop it from toppling over when the drum is on you should change the density of the box with the wheels attached to 100kg/m2, you could also do the same to the wheels to stop them from sinking! Now, make a large box above the (see the scene for rough sizes in relation to the rest of the printer) printer, fix it to it directly above the centre of the top diagonal bowes in your linkages and set it's collision layers to nothing. Now to make your printer look better, cut out the empty space at the front.
Step 5
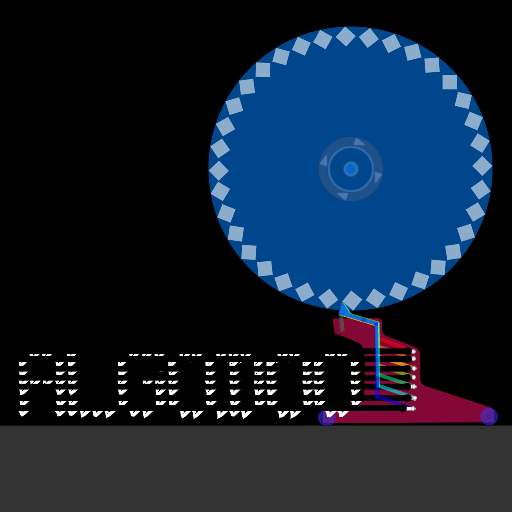
Now you'll need make the drum for your printer, firstly, you'll need to make a big circle and change it's appearance to protractor, then add at least 15 squares, rotate them round and fix them in. Then add an axle to the circle and change it's speed to around 6-7 rpm. Next you need to add tracers next to where the other ones (attached to the linkages). These must be the same colour as the background. Then switch ALL of the tracers fade time to ' +inf ' and then all of the squares friction must be changed to 0.
Programming
It works using collision layers, for example the smallest linkage is on collision layer E and the next one down collision layer D and so on, so if you make square all collision layers then it'll make all of the linkages work. So if you wanted to make a C you'd first:
Make a square collision layers B, C, and D,
Then make the next TWO collision layers A and C,
It should look a little like this
------VVV------
---V-------------
---V-------------
---V-------------
------VVV------
The Scene:
My Printer V2
Hope this helpful, if there's any issues (my spelling... I can spell but I can't type). Sorry a bit of the scene's step 5 is a little crappy but if you need any more information, please ask and if you're stuck on a part of step 5, my printer V2 is a viable alternative. If you use any of this in a scene of your own then please give me credit.
Please tell me if i've missed anything, MAKE YOUR PRINTERS!!
Please tell me what you think!!
If you're new to algodoo the making a 2d printer can sound very complicated, particularly if you have no knowledge of scripting, but really it's pretty simple.
All of these steps should be completed with the simulation paused.
Step 1
Firstly, make a biggish box and add some quite small wheels, then set their motors to around 60 rpm. You may want to adjust the speed later on depending on how fast your printer can produce letters/numbers.
Step 2
Next you'll need to make the mechanism. I'm going to use the mechanism i used in my Printer V2. Okay, you'll need a long thin box in a vertical position. Now create a wide thin box (horizontal) and using the rotate tool tilt itto around
-15˚, Now align them with the 2 diagonal boxes overlapping at each end but on opposite sides (a little difficult to explain, you're best looking at the scene (link at the bottom)). Next you need to add an axle to where the 3 boxes overlap, now move this assembly over to your box on wheels and align it in the centre. Now make some axles in the middle of the angled boxes. Next, highlight the whole thing and go to Collision layers> No self collision - on, and add a spring to the bottom of the top diagonal bow on your linkage assembly, change its torque to around 500Nm and damping to 1. Finally add a tracer to the end of the bottom diagonal box that is about the width of the box itself.
Step 3
Now's the tedious part, clone your linkage assembly over somewhere out of the way (it'll make your life a whole lot easier if you do!). Then, make a clone of your clone and shrink the vertical box, move the bottom diagonal one and replace the lost axle. Keep progressively doing this until you have 5 with the smallest just under half of the size on the biggest. It's important to remember that you're only shrinking the vertical box, the rest stays the same. When you're done, leave the smallest one's collision layer at A but, as you move to the next one switch it's collision layer to B, and the next one's is C and so on. Keep doing this until all on your linkages are a different collision layer. Now you need to align them on top of each other like shown in the scene (can't explain how to do it but put them all on top of each other with the top angled box of all in the same place).
Step 4
Now the printer is pretty much ready you need to make the drum mount. First to stop it from toppling over when the drum is on you should change the density of the box with the wheels attached to 100kg/m2, you could also do the same to the wheels to stop them from sinking! Now, make a large box above the (see the scene for rough sizes in relation to the rest of the printer) printer, fix it to it directly above the centre of the top diagonal bowes in your linkages and set it's collision layers to nothing. Now to make your printer look better, cut out the empty space at the front.
Step 5
Now you'll need make the drum for your printer, firstly, you'll need to make a big circle and change it's appearance to protractor, then add at least 15 squares, rotate them round and fix them in. Then add an axle to the circle and change it's speed to around 6-7 rpm. Next you need to add tracers next to where the other ones (attached to the linkages). These must be the same colour as the background. Then switch ALL of the tracers fade time to ' +inf ' and then all of the squares friction must be changed to 0.
Programming
It works using collision layers, for example the smallest linkage is on collision layer E and the next one down collision layer D and so on, so if you make square all collision layers then it'll make all of the linkages work. So if you wanted to make a C you'd first:
Make a square collision layers B, C, and D,
Then make the next TWO collision layers A and C,
It should look a little like this
------VVV------
---V-------------
---V-------------
---V-------------
------VVV------
The Scene:


My Printer V2
Hope this helpful, if there's any issues (my spelling... I can spell but I can't type). Sorry a bit of the scene's step 5 is a little crappy but if you need any more information, please ask and if you're stuck on a part of step 5, my printer V2 is a viable alternative. If you use any of this in a scene of your own then please give me credit.
Please tell me if i've missed anything, MAKE YOUR PRINTERS!!
Please tell me what you think!!
-

Benjii - Posts: 42
- Joined: Sun Apr 08, 2012 11:43 am
- Location: Peak District, UK
Re: Printer Tutorial
![]() by Nxdt » Fri Sep 21, 2012 10:59 pm
by Nxdt » Fri Sep 21, 2012 10:59 pm
Excellent tutorial! 
I think this is the most simplistic way to make a printer. And it is great because it allows you to expand the number of lines, so long as you have spare collision layers.
I think this is the most simplistic way to make a printer. And it is great because it allows you to expand the number of lines, so long as you have spare collision layers.
-

Nxdt - Posts: 1019
- Joined: Mon Aug 31, 2009 6:32 pm
- Location: Scotland!
Re: Printer Tutorial
![]() by Benjii » Sat Sep 22, 2012 9:56 am
by Benjii » Sat Sep 22, 2012 9:56 am
Thanks, it took me a while to make.
Did you make a printer?
Did you make a printer?
Si hoc legere scis numium eruditionis habes.
-
Benjii - Posts: 42
- Joined: Sun Apr 08, 2012 11:43 am
- Location: Peak District, UK
3 posts • Page 1 of 1
Who is online
Users browsing this forum: No registered users and 2 guests


